
I am not what one would call “crafty.”
That’s not to say that I don’t create. I’ve been known to wield a glue gun or two in my time. But I don’t seek out crafts just for the sake of doing them. I’ve never perused the DIY & Crafts section of Pinterest looking for fun activities. My short foray into crocheting ended quickly when I realized that the hat I was making was costing me $30 in supplies when I could buy the same motherfucking hat at H&M for $10. (Fuck you, yarn, for being so damn expensive. Who do you think you are?)
 And yet, I keep finding myself at my workbench with some form of project in progress. And this confuses me, because it’s not like I’m the sort of person who just invents undertakings for her own amusement. But recently, it dawned on me, the reason I’m an unintentional crafter.
I am a cheap-ass with very peculiar taste.
See, I tend to already have something in mind when I go hunting for a product. Maybe I can’t see each and every detail in my mind’s eye, but I know what vibe I’m looking for. And if I don’t find what I’m looking for in the style or function that I have in mind at a price that I’m comfortable with, I’d rather make or alter something so that it’s exactly what I want, versus having something that I’m not happy with. Am I a master craftsman? Absolutely not! Have I ever tried this technique before in my life? Not usually. Do I have any idea what the fuck I’m doing? Nopers! But I’m more afraid of having a bland, boring house than I am of fucking up a crafting technique, so I’ll always dive in with both feet (and lots of internet tutorials.)
Here are some of the things I’ve made or customized to my personality. (Meaning colorful. Shut up, I have a problem.)
My workbench stool
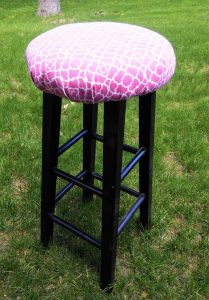
Why I customized it: I knew I wanted a padded stool for my workbench, because despite the…*ahem*… ample padding in my badonk, my ass tends to get sore sitting on hard objects for too long. But upholstered stools are both unnecessarily expensive and hard to find not upholstered in cheap black vinyl. My plan B was to just find a padded slip cover to put over the top, but those don’t seem to exist without featuring a sports logo. (Because apparently the only people on this planet who like padded stools are middle-aged men with man caves.) So plan C was to buy a classic black bar stool and upholster it myself.
Was it hard?: Kind of, though a lot of that may have had to do with the fact that the tutorial I was working off of wasn’t very thorough. It left out some seemingly insignificant details (like don’t cut your upholstery fabric shorter than your batting) that bit me in the ass when it came to finishing. I definitely learned a lot for the experience, and I think if I made another one it would turn out better. But even with my mistakes, I’m really pleased with how it turned out. The bright pink fabric adds a great splash of color to my little corner. (Just don’t turn it over; it’s kind-of a train wreck of hot glue and batting under there.)
Metal Bathroom Shelf
Why I customized it: This shelf 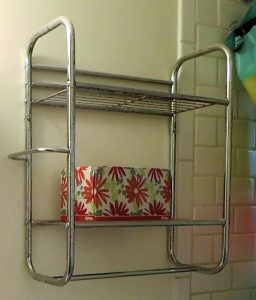 came with our house, and while it was very handy, it was also rusted and disgusting. Plus, I thought the chrome made it look a little cheap and tacky.
Was it hard?: Easy. Suuuper easy. A 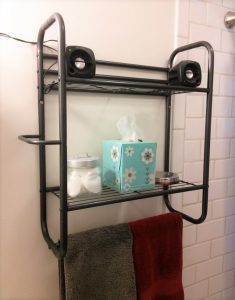 little clean up with a wire brush followed by soap and water, and a little metallic black spray paint was all it took to revive that baby. Really, the hardest part was picking out what finish we wanted it painted. (Okay, not totally true. The actual hardest part was to not be a dumbass and stand downwind while I sprayed it so that it blew back into my face.) But really, it only took a few hours to bang out, and now we don’t have a gross, rusty shelf on our wall!
Beeswax Candles
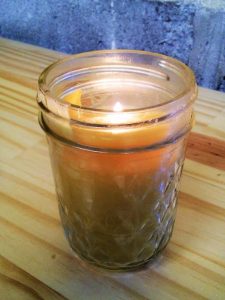
Why I made it: I love beeswax candles. Looooove. I love the warm smell of honey, the soft amber glow as they burn. I also love that they burn incredibly efficiently, and last much longer than paraffin. (Some people even claim that they remove toxins from the air and purify it, but I’m not sure I’m ready to believe that.) However I do not love that beeswax candles are balls expensive. Seriously, an 8oz candle sells online for an average of $15-$20, which is waaaaaaaay more than I’m comfortable paying, especially for something with a finite lifespan. So I said, “Fuck you, I’ll make one my damn self!” And I do, for about $3 and change per candle, depending on the price of beeswax.
Was it hard?: Not at all! I found a great tutorial that walks you through the steps. Besides, candle making isn’t really that hard; you just melt shit and pour it into a container. (I use mason jars, mostly because they’re cheap, but also because I know they won’t blow up or melt on  me when I pour hot wax into them since they’re meant for use in canning.) Really, the hardest part is figuring out how to keep your work space clean. I solved that problem entirely by buying a hotplate and doing my candle making at my workbench in our garage, but if you’re doing it in your kitchen it takes some thoughtfulness to keep your stove and counters free of wax. (Let’s just say that parchment paper is your best friend.) All that being said, it’s definitely taken me a lot of practice to get the process as easy and neat as it is now. So was it hard? No. Was it an elegant process right out of the gate? Strugglepants says no.
Kitchen Step Stool
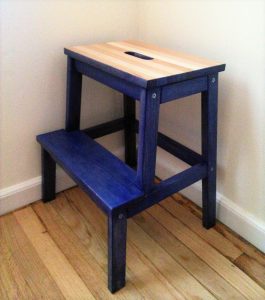
Why I customized it: We knew we needed a step stool, because our cabinets are hung weirdly high on the wall and we (mostly Kyle) can’t reach the top shelf. Ikea had two varieties of step stool, one plastic and one solid wood, and while I liked the modern style of the plastic ones, I couldn’t deny the functionality of the wood one. But the options–white, black, and bare wood–were sooooo booooooring. So we bought the bare wood step stool and I stained it blue. Much more interesting than plain black or white.
Was it hard? Not exactly. The process had a lot of steps, many of them which required curing or processing time, which requires patience. Which I’m not good at. And yet, it’s my lack of patience that resulted in my favorite happy accident: the natural wood top step. See, originally, I stained the entire step stool, including the top. And it was lovely. The last step (get it?) in the process was to paint the entire thing with a coat of polyurethane to protect the finish. The can of poly said that it would be dry to the touch in two hours, which I took to mean that at that point I could flip the whole thing upside down and poly the bottom. I was wrong. Super wrong. When I flipped it back over, the top had stuck to the table, ruining the finish on the top step. I was bonkers pissed but I’m also bonkers stubborn, so I sanded the top back down to bare wood to start over. However, when Kyle saw how it looked with the blue body and natural wood top step, he fell in love with it, and convinced me to just stop there. So I finished it with poly, and now I love it. I never would have thought for it to look the way it does but for that happy accident!
Wooden Spice Rack

Why I customized it: Another Ikea purchase (because two spice racks weren’t enough,) but this one only came in untreated natural wood, so I kinda had to do something with it. (I mean, I’m sure some idiots just take it how and slap it up on the wall, but those are the same idiots who are going to have to replace it in a year or two because the untreated wood got banged to shit. And I, at least in this particular scenario, am not one of those idiots.) So I stained it in the same blue stain as my step stool, partially because the matching pieces would look nice and partially because then I didn’t have to buy more stain. I even kept the cross bars natural, in keeping with the vibe of the stool.
Was it hard? Easy peasy, now that I’d been through the process once with the step stool. I knew what things worked well (using a foam brush for the stain and a bristle brush for the poly) and what pitfalls to avoid (drying each piece on a plastic cup so that there were minimal points of contact to get stuck.) The hardest part about this project was that because each individual piece was small, they didn’t have enough weight to stay still when I brushed them, meaning that I had to hold each one while I applied the stain and poly. Which is how I learned another lesson: it takes stain approximately three days to wear off of human skin!


Have you ever seen the movie Shag (if not, get on that this weekend)? Every time I see the word “beeswax,” I think of the line in the movie: “None of yo beeswax? That’s so queer!” (It’s set in the 50s, I should note.)